Victron MultiPlus-II 48/3000 off grid system made easy with Cerbo GX and EG4 battery
📦 Products Featured in This Video
📝 Description
Discount Coupon code ($50 off $500): SAVE50TGBATG Inverter: https://signaturesolar.com/victron-multiplus-ii-48-3000-48v-input-3000w-output-120v-35a-charger-transfer-switch/?ref=bkpkbxde Cerbo GX: https://signaturesolar.com/victron-energy-cerbo-gx/?ref=bkpkbxde Touch 50: https://signaturesolar.com/victron-energy-gx-touch-50/?ref=bkpkbxde EG4 Indoor Battery: https://signaturesolar.com/eg4-wallmount-indoor-battery-48v-280ah-14-3kwh-indoor-heated-ul1973-ul9540a-10-year-warranty-pre-order/?ref=bkpkbxde In this episode, we take a look at the Victron multiplus II inverter which is rated at a capacity of 3000 VA. This is an off grid inverter that can do charging and have an automatic transfer switch. We also look at connecting it to the servo GX and the touch 50 screen all powered by the EG4 indoor wall mount battery. This system is a solid reliable system that I would recommend for anyone getting started with solar because of the reliability of these components Victron MultiPlus-II 48/3000 Inverter The MultiPlus-II has all the features of the MultiPlus, plus an external current transformer option to implement PowerControl and PowerAssist and to optimize self-consumption with external current sensing. It also features built-in anti-islanding and an increasingly long list of country approvals. Features Unique PowerAssist - Prevents overload of a limited AC source. First, battery charging automatically reduces. Second, shore side supply will be boosted with power taken from the battery. Energy Storage System Combine with MPPT Solar Chargers or Grid-tie PV Inverters. UPS Function Automatically takes over in the event of a grid failure in less than 20milliseconds. Remote Monitoring and Control Access can be from a phone, tablet, laptop, or PC for multiple operating systems. Victron Energy Cerbo GX The Cerbo GX is Victron's newest communication center and allows you to get the most out of your system by managing it from wherever you may be. You can connect through the Victron Remote Management (VRM) Portal, access from the GX Touch, an MFD, or even connect from the VictronConnect App via Bluetooth. Features Perfect Monitoring & Control Control any setting to optimize the system, follow up on alerts, or perform diagnostics remotely. Maximize System Performance The Cerbo GX Maximises system performance in real-time! Simple Mounting & Configuration Optimized to meet installer standards. Victron Energy | GX Touch 50 The GX Touch 50 and GX Touch 70 are display accessories for Victron’s Cerbo GX. The five-inch and seven-inch touchscreen displays give Get an instant overview of your system and adjust settings in the blink of an eye with the touch screen displays. A waterproof design, single cable set-up, and simple installation create a tidy yet flexible framework that makes your system as pleasant to look at as it is to use. EG4-WallMount Indoor Battery 48V 280Ah | 14.3kWh | Indoor | Heated UL1973, UL9540A | 10-Year Warranty The WallMount Indoor 14.3kWh batteries are ideal for low-voltage residential indoor energy storage applications. The batteries use lithium iron phosphate cells with the highest safety performance and an intelligent Battery Management System (BMS) that can monitor and record the voltage of each cell along with the current, voltage, and temperature of the module in real-time. The BMS also contains a passive balance function and an advanced battery control method, both of which improve the performance of the battery pack. ON-BOARD LCD TOUCH SCREEN DUAL ON-BOARD FIRE ARRESTORS Offer fail-safe protection against thermal runaway. INTEGRATED SELF-HEATING FEATURE Internal heating keeps cells operating during cold temperatures. INTEGRATED BUSBARS The battery design comes manufactured with 600A internal busbars with multiple terminals (4 positive & 4 negative) eliminating the need for external busbars when paralleling batteries and/or multiple inverters. INNOVATIVE EMERGENCY STOP FUNCTION The optional ESS disconnect can shut down all batteries and inverters (if equipped with rapid shut down capability) with the press of a button. THE PERFECT PARTNER TO EG4 INVERTERS The optional conduit box mates up directly to the connection ports of EG4 inverters allowing a sleek and efficient installation. For other inverters or stand-alone battery installation, the conduit box plugs should be installed.
batterysolarinverteroff gridvictroneg4mppt48vbms
🎬 Related Videos
📝 Video Transcript
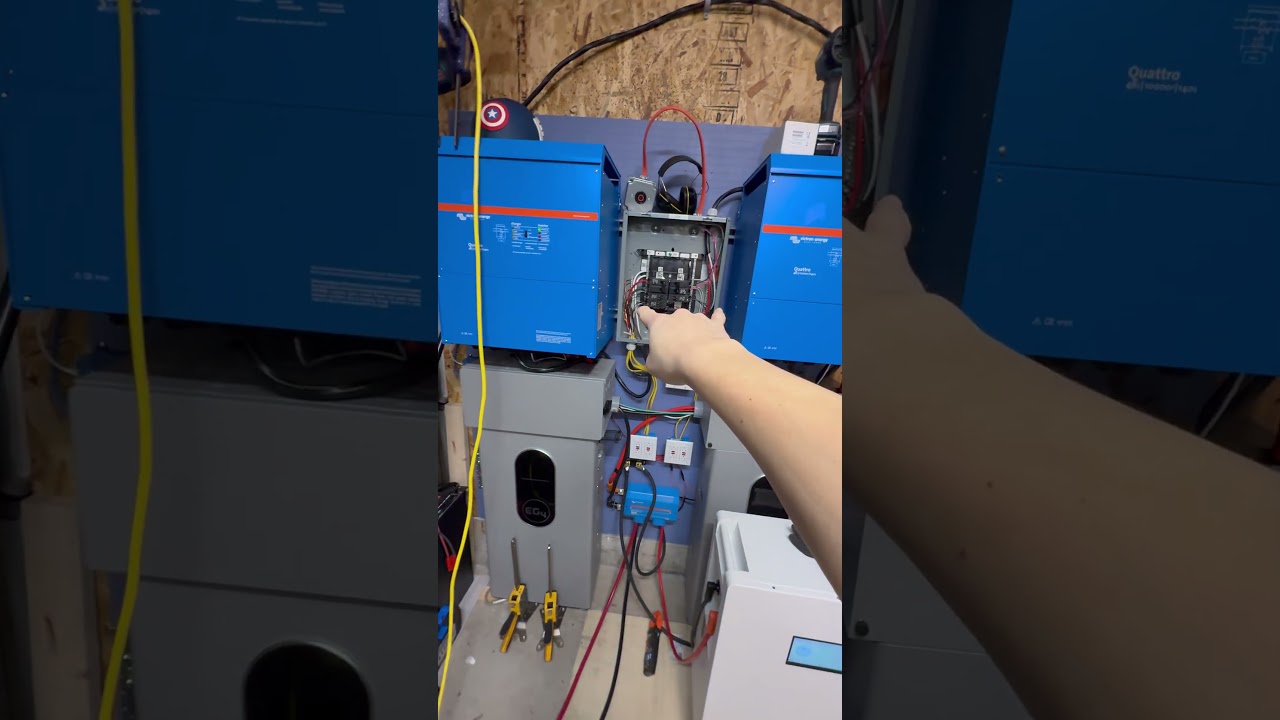
hey what's guys back to the channel on to episode we thought we go take a look at a victron system the more I use this system the better and capable I think it really is uh even though right now the craze on the Internet or at least uh in the industry I think right now seems to be about the all-in-one inverters or the hybrid inverters whatever you want to call them you know the inverters to have everything you need in one system but I do believe there is a place for victron modular type systems right uh not just the type of system but also the capab ities and components of it right so the more I use it the more I want to keep using it okay there's something that just kind of sticks around a lot of people will say it just works right and it really does just work okay so uh we're going to go over this victron system which is the multi plus2 48 volt 3000 VA system also with this CBO GX which is also connected to This eg4 indoor wall mount battery and I do believe this inverter with uh these wal Mount batteries are probably the best uh uh combination especially if you plan on expanding as you can see here um it's a really good combination because of all the pros and cons with just the battery system itself so we are not going to go over all the capabilities of the multi plusus 2 um because that would probably take 3 to 5 hours but we will cover the basics and the core things you really need to know about this system in case you were interested in a victron system and if people are saying well why would you get a victron versus all this other stuff well we're going to talk about that so if you're interested in it stick with us all right so first let's talk about this inverter and I will say uh this is a multi plus 2 they do have a multi plus one um and then this inverter is offered in a uh 12vt uh system which means the battery feed in right 12vt system 24volt system and also the 48volt system uh this inverter's also offered in uh lower and higher capacities I believe they have a 2,000 VA capacity a 5,000 and maybe even a 10,000 and uh this 35 amp uh rating here is really more of the charging or feed through capability okay so uh because you can connect to the grid it can do a lot of uh different things and you can also feed the power from the Grid or generate whatever to the AC output source so let's talk a little bit about uh this the basic capabilities of this inverter right so the feed through current maximum is somewhere around 32 to 35 the voltage range of the 48 volt system is somewhere between 38 to 66 volts okay so it doesn't have to be exactly 48 but somewhere in there uh is where you want to be which 48 is the sweet spot but like I said uh that's what this is the output voltage of this inverter is 120 volts right it is a singlephase lowf frequency Transformer based inverter um and if we didn't talk about this earlier let's talk about the 3000 VA here real quick so that is uh apparent power and depending on uh what kind of Machinery or whatever you're using to power this thing there is a conversation to be had about apparent power versus real power like real power a lot of people uh talk about Watts but apparent power is in VA right there's things that consume apparent power but in most of the US uh not a lot of the consumer electronics and houses or whatnot have to worry about uh a parent power but generally parent power is in VA and if you've been buying you know UPS's and stuff like that you know most of the UPS's are in VA ratings right but apparent power is in Watts okay so if you want to kind of get an idea of how to convert between the two you want to get the apparent power then multiply it times the power factor to get the real power and that's generally how most people or industry kind of accepts to do it uh so you know a 3,000 VA system times let's say a power factor of 7 right um would be somewhere around your real power which is I don't know what that is like 2400 Watts or something like that right so if your power factor is eight then you know times 3. 8 right that's how you would get Watts but let's talk about that right so the continuous power that uh this inverter is rated for at 25° C which is about 77° fah uh which is which is probably most normal people's operating environment it's going to be 2400 Watts that's continuous power but if you're in a little bit warmer 104 uh degrees Fahrenheit which is about 40° C it's going to be about 2200 watts and then if you're for some reason living in a desert and uh it's 150 degrees outside Fahrenheit which is about 65 degrees cels it's going to be somewhere around 1 1700 watts of continuous power and remember this is continuous power because it is a trans former based low frequency inverter can do a lot of Surge and I think the maximum Peak surge is somewhere around like 5,000 Watts or so but you know uh you only really have to worry about that when you're powering on like big Electronics or big equipment and stuff like that right so uh there is other things to be had in here with the victron software and all the stuff they have going on you know you can get better efficiency but I believe the maximum efficiency for this inverter is somewhere rated around uh 95 watt or 95 uh% this is a char charger right so when it's plugged in to a power source whether it's Grid or generator whatever it can charge the batteries and this is designed to charge 48volt batteries and right now it's not plugged in but if it was it would be either you know light would be on and then it would be telling you where it is in the charging cycle of that right um and uh the other thing that you won't see uh right now but we'll show you later is that this has an ac1 output and an ac2 output when you're plugged into the grid the grid um the inverter will actually feed ac1 and ac2 and then for whatever reason if the power goes out only ac1 will continuously be on right so uh it's almost like a UPS type system where the the switch over is instantaneous I don't think I've seen any inverter that's faster uh than this um but uh one of the reasons why we're looking at this is to kind of replace those UPS systems because you know every like year or two you're going to have to replace those batteries and that just gets annoying so it's better to get something like this where they switch over it's almost super fast that you know no electronics are really going to be affected there's ac1 and ac2 and then ac1 will always stay on assuming you have enough battery capacity and ac2 will just cut off okay that's one of the another more advanced features of this there are a lot of ton of advanced features of this that you know we're probably not going to get into but like I said cover the basic Advanced features of it but as you see on here this is really only an inverter and charger it do not have a solar control or charge controller built into it it also doesn't have like a a control system LED or LCD built into it this is really just serving two things this right here is a serbo GX and this is really what you call like the brains of the operation this runs a operating system or software uh that's built into here but I will state that you can download the operating system by itself and run it on your own machine or Raspberry Pi or whatever you want to but I think it's actually best to run it on here because all the ports and everything are properly configured you don't have to do any you know messing around but you know if it's a little bit priced out of your range you know I understand that but I will say there's a huge benefit to just getting the actual device and just ease of use and you know all that stuff right this has capability to connect to Bluetooth and you can run an access point right now my Bluetooth is not connected and if you do connect it to the internet this can connect to WiFi um you can it it can log pretty much send the data to the vrm console which is kind of like the eg4 monitor console that kind of tells you all the information about your system so you can connect this to Wi-Fi itself or you can connect it to an Ethernet plug as you see here I'm using Wi-Fi but you know let's get into it okay so it's got uh USB ports up here as you can see one of this USB ports is is plugged into this uh HDMI cable which is actually powering the victron uh energy screen that you can that uh you can buy separately with this and that you know is also a little bit pricey but it is really worth to have especially because it's a touchscreen right and you can configure settings back and forth okay there is a a set of ports back here that look like RJ45 ports which are actually V can victron energy can bus and there's another set of RJ45 ports back here which are V Bus victron Energy Bus they're different protocols I just want to point that out and then there is another protocol system back here called ve direct right and those are really more of just direct plugs and those are like you know just small DC plugs uh there is another portb here we kind of skipped over which is BMS can uh that's what this blue Cable's connected to and we'll talk about that a little bit in a second but this blue cable I had to custom make this cable it took all to figure out how to actually get it to work but this blue cable is connected to the eg4 indoor battery with BMS Communications and everything works properly so if you're wondering can you use the eg4 batteries with the serbo GX the answer is yes but you have to be using LL or the Power Pro batteries or indoor Power Pro whatever you want to call it right so that does work there's other ports on here um you know like tank sensors and when you buy it it comes with all the plugs you need to kind of make like the drag contact type system work there is a slot for micro SD in case you wanted to log uh data on micro SD and then upload it for some reason you didn't have internet connectivity or something like that speaking of that you can buy like an LTE dongle type thing that you can use to connect this in case you wanted to transmit uh you know from say The Boondocks or in the middle of nowhere to some LTE signal that you could probably get uh there's also relay you could use for generators uh to connect generators power on and there's really nice feature you can hit on this touchcreen to power on the generator assuming your generator has a drag contact capability and this feeds in from a power source so this right now is connected to a battery can feed in from a power source I believe anywhere between like 8 to 70 volts DC so any type of system that you're using your off-grid type system with um will need to power the system it cannot be powered uh by any ethernet cable like Poe I did try to that find some way to get that to work and that does not work you have to feed it power directly uh speaking of that this white cable back here which is plugged into V Bus is plugged into the inverter and we will take a look at that all right so we took the cover off and to take it off there's a screw right here Philips head screw here and here you take those two off the cover slides right off pretty easy these three connectors right here are your AC one out these three connectors right here are your ac2 out and these three are the AC uh in uh there's clamps for each of those there's also a little grommet for each of those uh this right here is your grounding screw you do want to make sure you ground it to protect the Earth or whatever else is uh metal um in your system for instance this case this ground wire is connected to the battery because the battery and the condo box is all metal this right here is your positive battery cable this right here is your negative battery cable in here you'll see mine's a little bit complicated I do not recommend you do this um this right here is a power cable for the serbo GX and this is the negative battery cable for the serbo GX um the reason it kind of looks like this and not the standard cable it comes with which is this right um is that I've added another layer of uh insulation a wire insulation then I wrap that layer in electrical cord or tape because of the uh grommets that were here okay it does include grommets for the battery cables here and you don't need battery CA C this thick this is two a cable which is way overkill for um this battery connection but uh these are the cables that came with the eg4 indoor battery and they do fit here and uh the reason I'm using these cables as mainly because I do think that that battery is again uh the best battery probably for the system especially if you add two or three or something inverters mainly because it comes with these and it fits perfectly with the Quick Connect all kinds of fun stuff okay I do not have the grommets on here because two OD cable is way too big for these grommets I'm sure you can probably somehow make it fit even if you did make it fit the uh terminals here that you were passing through would have been too big so if you are going to try to use this um put this put the grommets on first before crimping the cables which I obviously didn't do that I have a lot of uh splicing tape wrapped around here and also a little bit uh extra here to prevent any uh shaing or any possible contact between the cable inside and the case uh this white cable as we talked about earlier is the uh V Bus uh Port I'll take it off you can see some of the other ports on here if you look here there's a bunch of relays uh you can use there's a jumper you can use ve bus ve bus a current sensor 3. 5 mm Port that you can use for current sensors here there's other dry contacts here that you can use for all kinds of fun stuff uh White ethernet cart it's a standard ethernet RJ45 cable you plug in the V bus and you can also plug into the servo GX and it sets up communication uh between this inverter and the servo GX I'm pretty much using here a 12 12 gauge Rox um and 12 gauge Rox is solid so when you put it into these terminals here uh you don't really need a phro but if you're using thin stranded wire you do need to but if you're using something like let's say six gauge uh it it's stranded but it's like thick uh core stranded so you probably don't need to put a pharoh on here but I will say these or this connection method they have here is probably I would say the worst part of this entire system if there was anything to complain about uh you know I kind of understand why they want to do that make it a little bit easier you have to crimp stuff or you know all kinds of other stuff uh but the way that the crimp or the connection is made here is that there is a little Port you see two ports here there's a port where the wire goes in and a rectangular Port right above that you have to use either a flathead screwdriver or in my case I also used uh a framing nail to press in that port to Red to uh relieve the pressure on the spring that clamps down on the cable so this is a friction type fit uh clamping system it's not like the just screw that you screw and it clamps together there's a springloaded clamp in here and it clamps down on the wire right and even on these so if you pull it do a solid pull test and it's not going to go anywhere but it is a pain to work with uh when you're removing stuff um if you're using RX solid core cable it's not that bad cuz all you need to do is insert it and you know you're probably not going to take it off depending on whatever you're doing but there is uh warnings written everywhere especially here right and on the cover and on the label that says you need to insert it a minimum of 7 um and you need to strip maybe about uh a whole inch of the wire goes in there but the core of the wire the conductor needs we strip to about 7 okay so um there's been I want to say probably issues and maybe even POS possible fires due to bad connections made here by people so I will highly emphasize uh when you are using this make sure you make a good solid connection somewhere close to about a quarter of an inch of exposed conductor needs to be fully inserted into this connection mechanism cannot emphasize that enough it's much easier to do when you using solid core wire which is why I pretty much set this up with the RX hero second thing I'll note on here is that this wire here is severely undersized but this is the wire that I uh just found right here on hand I crimped ferals on there and put it in here but this I believe is like a 16 or maybe 14 gauge wire and um you put ferals on here because this is uh pretty thin stranded and you put it into the AC in and there's a core so you can plug it into the wall in case you need to right but um even though it is under size you can go into the settings and set the maximum AC in current so if you are going to undersize the wire make sure you properly set the settings or you're going to pretty much overload the wire and have all kinds of issues there's a bunch of ventilation holes here you can see on this side and this side uh the switch for turning the inverter on is here if you pull it towards you which is option number one or or one uh line then that means it's on full mode inverter mode charger mode whatever if you flip it towards the back which is two stripes or two lines you're operating in charger mode only so you know inverter function is not going to work or any of that stuff the other thing to point out on here is that the DC input which is this battery system here is isolated from the AC output you cannot say that on all inverters but on this inverter it'll even tell you here right and because also a transform base inverter and you can look at the design um it is isolated so that is a huge plus so this here is the conduit box you just saw and then the conduit box is part of this eg4 battery or you buy it separately technically but you can buy it as a kit uh and it has this metal conduit box attached to the battery using four screws uh when you buy the battery it does come with these two out cables using these enel style connectors they're actually dexon connectors but people just refer to them as enel style even though the nanel is the brand but it's a quick connect right so you take the cable you plug it in there press press it down and it's solid and good to go it's rated for you know the the current that it can handle it comes with two of these we're using one set right now for this inverter the future plans is to you know uh expand the system and use the bus bars that are on this battery to expand it right so this battery the indoor battery comes with uh the builtin four connectors which is the bus bar internally on here so expanding it or adding more inverse actually just makes it super simple so negative connected positive connected um on this uh door here you'll see this green wire which is for ground there is a grounding uh screw in there this copper cable which is undersized we'll have to fix that later is uh connecting the metal parts of this battery this conduit box to the middle part of the uh inverter as you saw up there on that grounding plug you see here this is the wire for the uh serbo GX which I kind of have just powered the battery terminals you just saw earlier white wire goes to the uh inverter and this blue wire is a ethernet uh wire or cat 6 cable technically which we custom made to work with this BMS can so uh this battery does work with the serbo GX it took me a lot of you know trial and errow trying to figure out how to make it work but we did make it work if you're curious in that there'll probably be a different video dedicated on how you can kind of set that up but that's how the internal part of this conduit box is connected to let's just say the inverter and also the Sero GX so this right here is eg4 Walmart indoor battery and you probably seen this battery but just in case you haven't here's a quick overview uh it's eg4 branding stand right here which you can't see but it's got for the green bar so that kind of tells you the status of fuel gauge of the battery has like two other LEDs right here for alarm uh in case something happened it flash red green flashing means it's running and it's working pretty good as you can see on here this is also a touchcreen it'll tell you the state that it's in whether it's discharging or charging right the address I have set on here is one and right now I have set the can protocol Communications on here the p06 which is victron okay that's how we got the BMS Communications working this right here is the protocol you have set if you're using rs485 which you're not using the reason I keep touching this is I don't want to turn off uh this right here is the voltage this right here is the amp power capacity and this is the amps currently uh running through the battery which right now is . 9 amp you can go in the settings and you know look at other stuff uh at the temperature I'll change other uh uh communication protocols and also uh look at the version of the firmware and all that kind of fun stuff so like I said this stuff is all here so this is a really nice battery especially if you combine it with the uh uh conduit box because everything sits nicely inside the conduit box and can look decently pretty clean so this right here is a GX touch 50 uh it actually connects it's a hardwire cable permanently installed here uh using this uh uh HDMI cable and it permanently connects as you saw earlier on there with HDMI it is a touchcreen and I'll try to stand so the glare is minimized here but it's got this thing called Pages which kind of shows you the pages you can kind of see like this page right here or you can go and look at this page that kind of gives you like a system overview right so uh the information is very similar on both pages but right now you can kind of see that the battery is at 98% capacity see if we can get that to go away here get the screen to minimize ah just minimize oh there it goes well let's go back to Pages um right now it's the inverter is in status inverting and you can see the power flowing from the battery to the inverter and from the inverter to the AC load so right now there's a 40 watt load on it it's just you know small fan uh but also tell you uh how much is coming out of the battery which is 47 Watts right uh the battery current voltage and the amps currently coming out of it this red box here is for or Grid in or AC in right so if you had grid connected there would be you know grid power flowing from here or generator connected it would just be flowing from here right so there's an empty white box here mainly because I do not have a solar charge controller connected to the system if there was a solar charge controller connected to the system it would be here uh but currently all the panels that I have are connected to uh the other system I have so there's no panels connected to this but this is where the panel configuration would be or the status would be and the little dots flowing is pretty much how the energy is currently flowing inside the system so this is a really nice screen it is touched like I said and depending on you know which screen you go to you can kind of see different things here right so it's all the same stuff just in a different manner uh other thing on here uh you can go in here and look at the settings so if I go in the menu here's all the devices that are currently connected to the system you can see right here the eg4 LL battery is connected cuz I have the comms uh configured uh it's at 98% here's the battery status you can go in here and then also see the metrics or the data from the battery right so if I stand well enough you can kind of cover some of the glare but it's got state of charge state of health battery temperature it's got details on other stuff going on in here like lower cell voltage High cell voltage temperature all kinds of stuff right currently configured number of amp hours right so uh when you get Communications working with this battery it's really nice if there's any alarms you can kind of go in here and see the alarms right right now they're all okay cuz as you saw there was no alarms on that uh battery uh screen there was no like red LEDs or anything like that um the device you can kind of go in here and say yes where it's connected and it's using canbus right um for more version all kinds of stuff is on here you can even go to the parameters and look at what the parameters are set to as the communications kind of went and go ahead and set that up right but if you go back to menu here's all the other devices that are connected so here's the multi plus 2 that's connected uh it's switch on you can kind of set this so if there's a little black triangle at the corner here it means you can change it right so I can go in here click on on and it'll figure out you know do want turn it off charger only inverted only whatever right uh this right here is input current limit so I currently have it set to 9.
5 mainly because as we talked about the undersized wire right there right but if I go back there uh you can go back in here actually let's get out of here and then you can look at the DC voltage DC current active AC input which is you know not connected it's disconnected the AC line one in um obviously not connected as we just talked about but the output is connected and it's doing 120 volts right 40 watts and it's going about 60 HZ there's all kinds of stuff you can do in here we can spend you know hours in here but we're not going to go you know look at every single detail but like I said we'll talk about the important things cuz this is connected to vebs to this product and it's using this form Ware also on here you can go and do firmware updates on here um you can also go into the settings of this uh Sero GX which is in here and you can look for firmware updates right that when gives you the firmware updates you can also install the firmware from if you're in like a remote area get on like a USB stick or micro SD card put it in there and do updates right uh you can also store backup depending on you know what you really want to do but uh there's also a section in here for in uh notifications which tells you you know any alarms that comes up right like for instance I had one on here that said a new firmware needs to be installed uh I didn't capture in here I'll see if I can find the recording I kind of caught it at the end um and it'll tell you hey notifications are up there but that only happens if you go in here and you go to Firmware and you do uh check so online updates you go to online updates you can do check only you can also do like check and install or check or update right I have it to uh actually just went to check and update but I only wanted to check right now right I want to be able to control when it gets updated right you can also press here to check in case you wanted to check but as I mentioned it's got all kinds of stuff in here there's no I'm not going to go through every setting but the basic idea is all the devices you have connected on here are going to show up in just device list the battery the inverter obviously the Sero GX probably won't show up on here because that's pretty much the brains of this operation uh but all the other devices like if had another multiplus or some other stuff connected it would show up here or the shunt right which I don't have all right so let's go to take a look at the screen so I just plugged in the Grid or the AC in or Mains in so you can see the red boxes here lines or power is coming in about 1,000 watts is coming in from the grid and part of it is going to uh the uh battery right so the battery is being charged at roughly 888 Watts 16.